
Create jobs from Outlook emails: ServiceM8, Jobber, Tradify and Simpro step-by-step
Jump To...
Outlook email flowing into a job card for ServiceM8, Jobber, Tradify and Simpro
Who this is for
- Owners, office managers and schedulers in UK plumbing, electrical, HVAC and building firms who get jobs by email from letting agents, B2B clients or suppliers.
- Anyone losing time copy pasting email details into a job system.
How the email-to-job flow works
At a high level, you’re doing three things:
- Catch incoming emails in Outlook with a rule and forward them to a special address or automation.
- Your job system creates a job or enquiry record from that email.
- You map fields like client, site address, description and attachments to the new record and notify your scheduler.
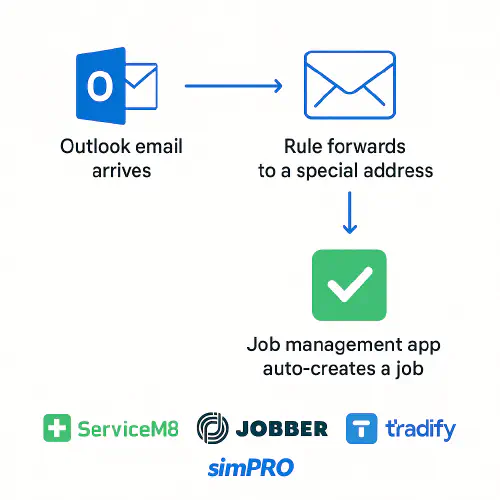
Flowchart showing Outlook email to job creation in ServiceM8, Jobber, Tradify and Simpro
Option 1 ServiceM8 inbox to job
.svg)
ServiceM8 provides an inbox and a quick convert flow so you can turn an email into a Quote or Work Order.
- Video overview from ServiceM8: Convert Emails into Jobs
- Support articles: Automation overview, Quote follow up automation
Steps
- In ServiceM8, copy your unique inbox address from Settings. It looks like something@in.servicem8.com.
- In Outlook, create a rule to forward matching emails to that address (see Outlook rule section below).
- In ServiceM8 Inbox, open the message and select Convert to Quote or Convert to Work Order. Attachments and body text will copy across.
- Optional Automations: Use ServiceM8 Automations to email confirmations or request more info automatically after creation.
Tips
- Ask regular clients to include a clear subject like JOB REQUEST and the site postcode.
- Set a badge or tag when you convert so you can report on jobs created from email.
Option 2 Tradify email enquiries to job
Tradify can turn inbound emails into Enquiries automatically, which you can convert to a Job when ready.
- How to set it up: Set up Email Enquiries in Tradify
- Useful: Email Templates in Tradify
Steps
- In Tradify, enable Email Enquiries and note the special enquiries address.
- In Outlook, forward matching emails to that address.
- In Tradify, the email appears as an Enquiry with attachments. Review and click Convert to Job.
- Add the customer, site address and schedule your team.
Tip
- Use Tradify’s appointment reminders to confirm attendance once the job is scheduled: Appointment reminders.
Option 3 Jobber via Outlook plus Zapier or Power Automate
Jobber doesn’t offer a direct email-to-job address, but you can create jobs automatically when Outlook receives an email.
Two common approaches
- Zapier: Outlook or Email by Zapier trigger to Jobber Create Job action. See Jobber help centre for job basics: Create a One-Off Job.
- Microsoft Power Automate: When a new email arrives in a shared mailbox, parse it and call Jobber via the Zapier connector or your preferred integration.
High level Zapier flow
- Trigger: New Email in Outlook with subject contains JOB REQUEST or from a known sender.
- Formatter step: Extract phone number, postcode and any reference from the email body.
- Action: Jobber Create Client if missing, then Create Job with description, scheduled date placeholder, and attach the original email as a note.
References
- Jobber marketing and communication features to notify clients once booked: Campaigns | Marketing Tools
- Client Communications Report to see sent messages: Client communications report
Option 4 Simpro via Data Feed or Zapier
Simpro offers multiple routes to turn emails into jobs or to attach documents to jobs.
- Simpro Data Feed overview: Automating data management with Data Feed
- Outlook integration and notifications: Simpro Outlook Integration, Notifications
- Zapier examples: Email by Zapier Simpro Integration
Typical setups
- Data Feed: Send a structured email to a monitored inbox. Data Feed extracts fields and creates or updates records in Simpro.
- Zapier: Trigger on a new email, then Create Service Job in Simpro with parsed fields and attach the original email or files.
Outlook rule to catch the right emails
Create a simple rule so only genuine job emails are forwarded.
Steps in Outlook for Microsoft 365
- Go to Settings, then Mail, then Rules.
- New rule: Name it Forward job requests.
- Condition: Subject includes JOB REQUEST or From equals the client domain. Add more conditions if needed, like has attachments.
- Action: Forward to the special address from your job app or to your automation tool.
- Stop processing more rules so it doesn’t forward twice.
- Test with a sample email before going live.
De-duplication, parsing and good email templates
Avoid duplicates
- Key fields to check: client email, site postcode, client reference or PO number. Your automation should search for an open job with the same trio before creating a new one.
Parsing tips
- Ask clients to follow a simple request format so your automation is reliable:
Subject
JOB REQUEST Boiler service SE15 4XX ref 12345
Body
- Site name and full address
- Contact on site and mobile
- Access notes or key safe
- PO or reference
- Target date and any constraints
Attachments
- Send PDF work order and photos if available
Testing, audit trail and GDPR notes
- Create a test mailbox and run for a week before switching clients onto the new process.
- Keep the original email attached to the job for audit. This helps with disputes and CDM record keeping.
- Only forward what you need. If emails include personal data, ensure you’ve a lawful basis and keep retention periods reasonable. See ICO guidance on lawful basis and retention.
Related Academy reads
- Calendar sync issues and BST shifts when you connect job apps to Outlook: Outlook ↔ ServiceM8/Jobber/Tradify (UK): stop duplicate calendar entries and fix BST/GMT shifts
- Turn voice notes into tidy job reports: Voice notes to job report
- Get more reviews once jobs complete: How to get more Google reviews for your trade business
Troubleshooting
- Nothing is arriving in the job system: Check the Outlook rule, verify the destination address and that forwarding is allowed on the mailbox. Try sending a plain text test.
- Attachments missing: Some tools strip large files. Keep under 10 MB or use cloud links.
- New clients not matching: Add a Create Client step when the email sender is unknown.
- Double jobs: Add a 5 to 10 minute delay then de-duplication check before creation.
FAQ
Can I route different clients to different pipelines or teams? {#…
Ready to Transform Your Business?
Turn every engineer into your best engineer and solve recruitment bottlenecks
Join the TrainAR Waitlist