
How to use a thermal camera on site: find leaks, damp and hot connections
Jump To...
Who this is for
This guide is for UK electricians, plumbers, heating engineers and general contractors who want fast, reliable diagnostics using a thermal camera. No jargon, just practical steps you can use on callouts and surveys.

Engineer scanning a radiator and consumer unit with a thermal camera on a UK site
Quick wins with thermal imaging
- Find hidden water leaks without ripping floors: scan for cold lines in heated screeds or cooling from evaporating moisture. If you work on wet underfloor systems, see our underfloor heating troubleshooting guide.
- Spot overheating electrical connections: loose terminations show as a clear hot spot against nearby conductors.
- Prove heat loss around frames and voids: quick before and after shots help clients understand the value of your fix.
Why it works: thermal cameras display surface temperature patterns. They don’t see through walls, but temperature differences reveal issues nearby.
Setup that actually works on site
Get these right and your readings will make sense.
- Emissivity: set 0.95 for painted walls, plaster and skin. Shiny metals are reflective; either cover with tape or paint, or use a high‑emissivity reference next to the target. Good background from Fluke.
- Reflections: avoid scanning mirrors, stainless, glossy tiles or wet surfaces. Move position or angle to reduce reflections.
- Focus: manual focus beats auto in tight panels. A soft image can hide hotspots.
- Distance and spot size: stay close enough so the area of interest fills a decent portion of the frame. Small targets need higher resolution sensors.
- Palettes: ironbow or grey often make faults pop. Avoid rainbow for reports.
- Ambient control: draughts and sun can fake patterns. If you can, let temperatures settle a few minutes before you shoot.
Scan patterns that save time
Use a repeatable sequence.
- Wide sweep to get the lay of the land.
- Isolate the anomaly: zoom or move closer.
- Compare with a known good reference nearby.
- Capture one thermal and one visual image for context.
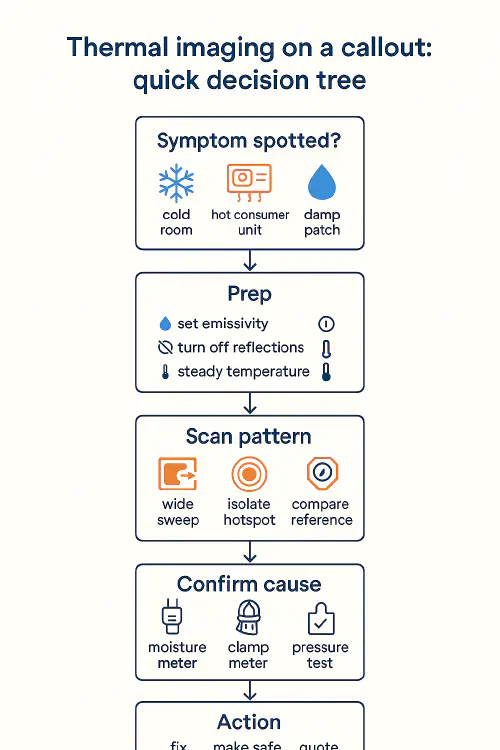
Flowchart: thermal imaging decision tree from symptom to action
Confirm the cause before you quote
Thermal shows you where to test next. Always confirm with a second method.
- Moisture issue: use a moisture meter and, if needed, salts test on masonry. Cooling patterns alone don’t prove damp. See consumer‑friendly advice from Warm and Well.
- Electrical hot spot: verify load with a clamp meter and tighten or replace the joint. Baselines for panels are discussed by Fluke.
- Heating loop: pressure test, or use dye if appropriate. For UFH faults, combine IR with loop isolation. More context in our UFH fixes guide.
Use cases by trade
Electricians
- Consumer units and busbars: look for one conductor significantly hotter than the rest under similar load. Clean, tight terminations fix many faults.
- EV charger tails and isolators: load test and compare phases.
- Motors and MCCs: heat patterns can suggest failing bearings or overloaded circuits.
Safety: if you document findings as part of condition reports, align with your EICR process and competence requirements. NICEIC has guidance on competence for inspections.
Plumbers and heating engineers
- Find UFH pipe runs, cold patches in radiators and mixing valve issues.
- Track leaks under bathrooms and in voids by spotting evaporative cooling patterns.
- Check flow and return on boilers and plate heat exchangers.
Tip: for shiny copper, stick a small piece of black electrical tape on the pipe to get a reliable reading.
Builders and surveyors
- Insulation gaps, thermal bridges and draught routes.
- Roof leaks after rain, before everything dries and equalises.
- Document fixes in your handover pack. Clients love QR‑linked evidence. See our digital handover pack with QR codes and our O and M manual guide.
Buying or hiring: what to look for
- Resolution: 160x120 is a practical minimum for trade diagnostics. 256x192 or 320x240 makes finding small faults easier. Phone add‑ons are better than nothing, but a focused handheld is usually faster.
- Focus: manual focus helps in panels and close‑ups.
- Frame rate: 9 Hz is fine for most building work. Higher rates help with moving targets.
- Lenses: macro clips are great for PCB and small parts. Wide lenses help in small rooms.
- Reporting: in‑camera visual plus thermal images save time writing up.
- Hire: short job or survey season? Hire from UK providers like Inlec, which lists units such as the FLIR C2 for short‑term use (Inlec FLIR C2 page).
- Where to buy: comparison pages like RS Components thermal cameras and Test Meter thermal range show current stock and specs.
Document your findings like a pro
- Capture paired photos: one thermal, one normal.
- Add a short note with location, suspected cause, and next action.
- Store in the job file and reference in the quote or RAMS if it affects method. Our RAMS guide explains how to brief the team.
- Include before and after shots in the client handover. For larger jobs, roll these into your O and M and asset register.
Common mistakes to avoid
- Trusting rainbow palettes that make minor differences look dramatic.
- Reading shiny metal surfaces without emissivity correction.
- Scanning in direct sun or strong drafts and assuming patterns are faults.
- Treating thermal as proof of damp without a moisture meter reading.
What are people saying on Reddit
Real‑world chatter backs up the value of IR for trades:
- First‑time users quickly find leaks and overheating parts and wonder why they waited so long. See the discussion: https://www.reddit.com/r/Tools/comments/1m9ihv9/i_finally_got_an_infrared_thermal_camerawhy_didnt/
- Budget questions are common; pros suggest spending enough for manual focus and decent resolution: https://www.reddit.com/r/Tools/comments/1jskuxt/ok_you_tool_gurus_give_it_to_me_straight_am_i/
- Side‑by‑side reviews show the gap between cheap phone dongles and mid‑range handhelds: https://www.reddit.com/r/Thermal/comments/1m9h14y/reviewing_a_80_and_599_thermal_camera_on_home/
FAQs
Can a thermal camera detect damp?
It detects temperature patterns, not moisture directly. Cooling from evaporation or cold bridging can indicate damp. Confirm with a moisture meter and salts test for masonry.
Are phone‑based thermal cameras good enough?
For simple scans they can help. For electrical panels, tight spaces and small hotspots, a handheld unit with higher resolution and manual focus is more reliable.
What emissivity should I use?
For painted walls and plaster, 0.95 is a good starting point. For shiny metals, use tape or paint to get a stable reading.
Do I need a qualification to use thermal imaging in the UK?
No formal licence is required for general building diagnostics. You must still be competent for any electrical inspection or remedial work you carry out. Manufacturer courses from FLIR and Fluke are useful for best practice.
Can thermal imaging see through walls?
No. It shows surface temperature differences. Use it to decide where to test next.
Ready to Transform Your Business?
Turn every engineer into your best engineer and solve recruitment bottlenecks
Join the TrainAR Waitlist