
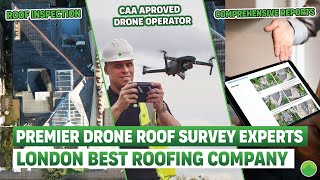
Quick Answer
A sub-250g drone, the free DJI Fly app, a £12.34 CAA Operator ID, and a basic insurance policy will give you a complete roof survey kit for around £800 to £1,000. The maths is simple. A scaffold quote on a typical two-storey job is £900 to £2,500 for a week's hire before anyone climbs on it. A drone survey takes 30 to 45 minutes, costs you nothing per job once the kit is paid for, and gives the customer better evidence than a ladder ever could. The catch is doing it properly: legal airspace, a flight pattern that misses nothing, and software that turns the imagery into a quote a homeowner will sign. Get those three right and you've stripped £500 to £2,000 off every roof job's quoting cost.
Table of Contents
- What you save (and what you'll spend)
- The kit you actually need (under £1,000)
- Sorting CAA registration in an hour
- The pre-flight checklist you do every time
- The flight pattern that captures a complete roof
- What good imagery looks like, and the AI bit
- Turning footage into a quote that wins
- The scaffold-versus-drone reality check
- Insurance, liability, and when to call in a pro
- A 90-minute survey from arrival to invoice
- What tradespeople are saying
- Recommended videos
- Frequently asked questions
- My verdict
What you save (and what you'll spend)
I've watched roofers price a £4,000 repair off a phone snap taken from across the road, and I've watched them lose the job to a competitor who turned up with a drone, sent a 12-page PDF the same evening, and closed it. The drone didn't win the job. The evidence did. A roof survey done from the ground misses 60 percent of what matters. A scaffold survey is accurate, but the homeowner has to pay £1,500 to find out their roof is fine. Drones sit in the middle: ladder accuracy, scaffold detail, no scaffold cost.
The setup math sits at four numbers most trades businesses don't have in their head. They matter because they decide whether this works for you. A new DJI Mini 4 Pro Fly More Combo is £979 from Currys as of 2026. A used Mini 3 Pro from MPB sits around £534 with a 12-month warranty. The annual CAA Operator ID is £12.34. A basic Moonrock or Coverdrone policy starts at about £31 a month for £1m of public liability. That is your floor. Everything beyond it is optional.
The competitor gap here is obvious. Almost every drone guide on the internet is written for commercial drone operators who charge clients to fly. This one is the opposite. You are a roofer, a builder, or a surveyor who wants to stop quoting blind. The drone is internal kit. The saving is the customer's scaffold fee, which becomes leverage on the quote.
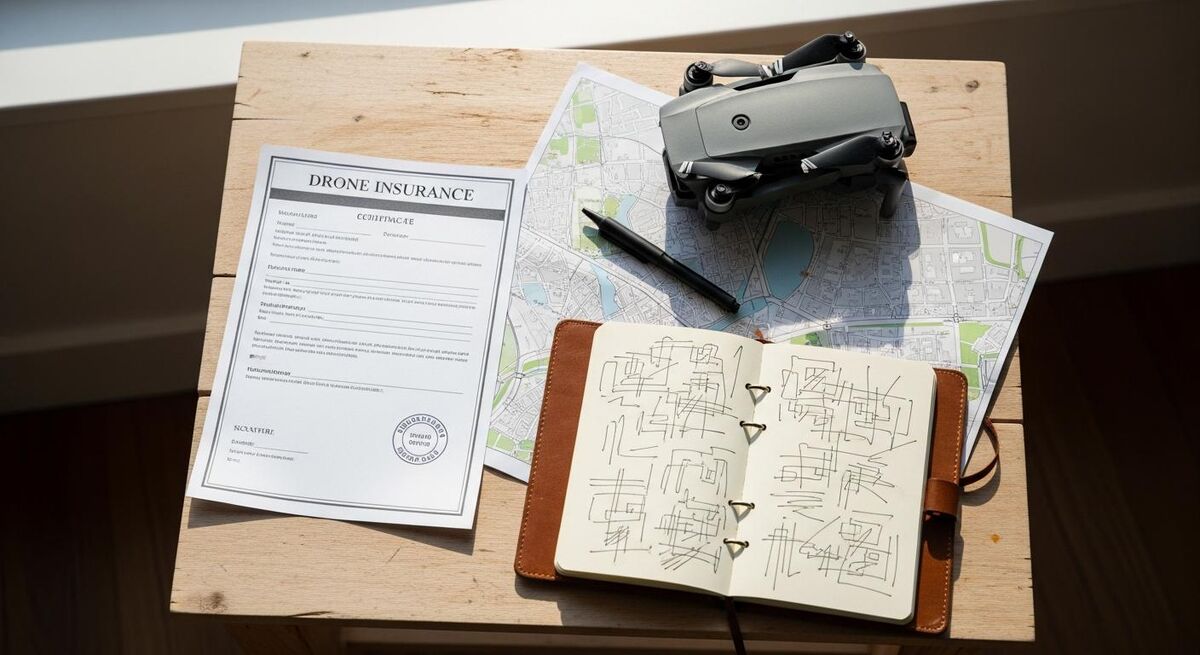
The kit you actually need (under £1,000)
Stop reading drone reviews. For roof surveys on UK residential and small commercial jobs, you want one thing: a sub-249g DJI drone with a stabilised 4K camera and obstacle avoidance. Anything heavier triggers an A2 CofC requirement near uninvolved people, and the gap between "I can fly this anywhere reasonable" and "I need to chase neighbours' permission for every job" is the difference between a useful tool and a paperweight.
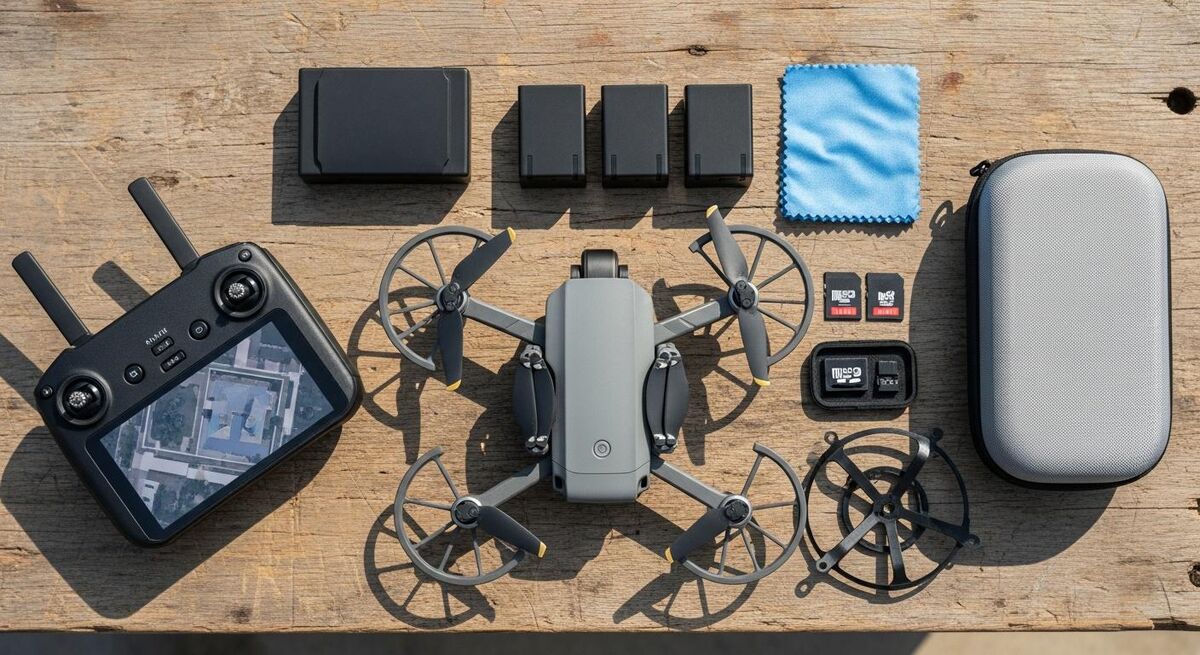
The DJI Mini 4 Pro is the workhorse. The Fly More Combo at £979 gives you three intelligent flight batteries, which is the only spec that matters in practice. One battery gives you 34 minutes of flight time on paper, around 22 minutes of useful survey time once you account for wind, return-to-home reserve, and the bit at the end where the battery sags. Three batteries means you can do two roofs in a morning without going back to the van.
If £979 is too much, a used Mini 3 Pro from MPB at £534 does 80 percent of the same job. You lose the omnidirectional obstacle sensing and a bit of low-light performance, but for a roof survey at 10am on a Tuesday, neither matters. What does matter is buying from somewhere with a warranty. Gumtree saves you £100 and costs you the ability to claim if the gimbal arrives wonky.
The kit checklist
Drone (DJI Mini 4 Pro new or Mini 3 Pro used). Three batteries minimum. A 128GB UHS-I microSD card. A microfibre cloth for the lens. A soft case for the van. Propeller guards if you are surveying anything within 5 metres of a wall. That's the lot. Add a sun hood for the controller if you are doing summer work and squinting through a glare-washed screen is the difference between a usable shot and a redo.
Software is the next budget line. The DJI Fly app is free and does everything for the actual flying. The work happens in post: stitching shots, marking defects, generating a PDF. Hammer Missions runs the trial for 14 days free, then the entry plan is $79 a month if you pay annually. That converts to around £63 a month at current rates. It is American-priced, but it works in pounds when you bill clients. If you only do a few surveys a month, skip it. Pix4D Capture is free for the flight planning piece, and you can drop the imagery into any annotation tool you like.
Sorting CAA registration in an hour
This is the bit that puts people off, and it should not. The UK system is simple if you do it in the right order.
First, the Flyer ID. This is the test that lets you pilot the drone. It is free, online, and takes about 30 minutes. Forty multiple-choice questions covering airspace, distance rules, and emergency procedures. You can retake it as many times as you need. Get the official CAA Flyer ID done before you even unbox the drone.
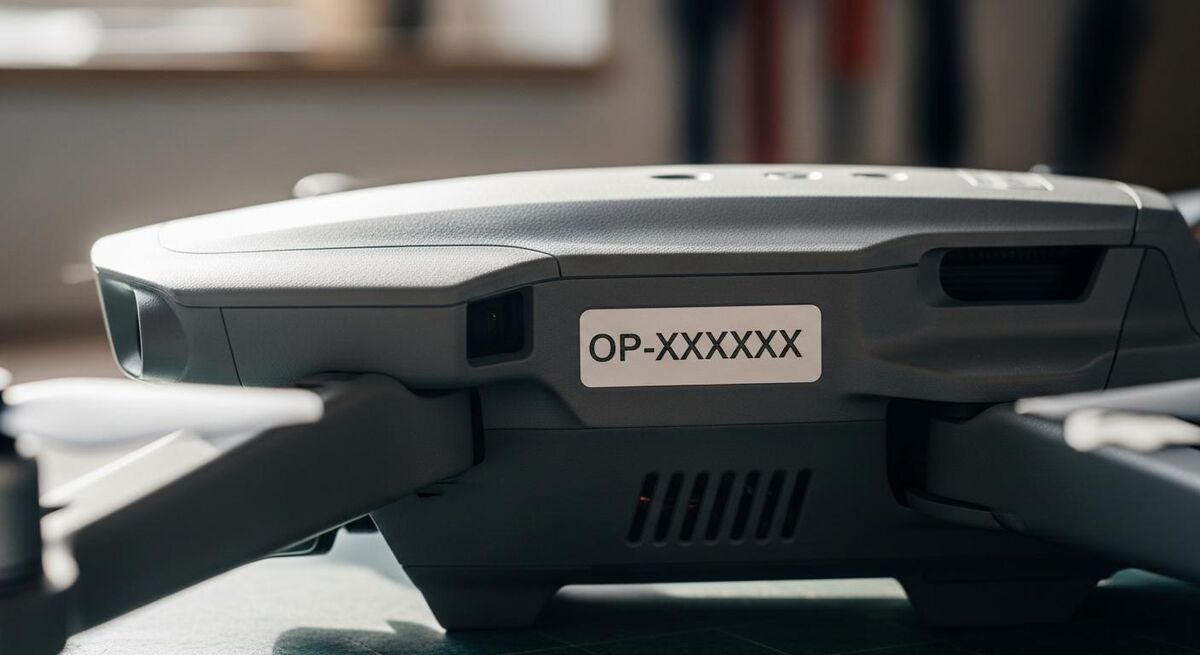
Second, the Operator ID. £12.34 a year, renewed annually. This is the legal entity responsible for the drone. If you trade as a limited company, register it to the company. If you trade as a sole trader, register it in your name with your business as the trading name. The ID has to be displayed on every drone you own, in lettering at least 3mm high, on the body or inside an easily accessible compartment.
Third, and this is the one most trades skip, the A2 Certificate of Competency. You only need this if you plan to fly a drone heavier than 250g near uninvolved people. With a Mini 4 Pro at 249g, the open category covers most jobs. Where the A2 CofC earns its keep is when a customer wants thermal work and you bring in a Mavic 3 Enterprise for the day. Until then, save the £99 the training providers charge.
The 50-metre rule, simplified
With a sub-250g drone in the open category A1, you can fly over uninvolved people but not over crowds. With anything heavier, you stay 50 metres horizontal from uninvolved people unless you have an A2 CofC, which drops it to 5 metres. For roof surveys this means: if the property has a 5-metre garden, a Mini 4 Pro works anywhere. If it doesn't, you ask the neighbours, or you stay sub-250g.
January 2026 introduced class marks and Remote ID. The Mini 4 Pro ships as a C0 class drone, which means it is already compliant. Older Mini 1s and Mini 2s have until 1 January 2028 before they need retrofit Remote ID modules. If you are buying second-hand, check the box for the C0 marking. No C0 means more paperwork.
The pre-flight checklist you do every time
Treat this like a gas safety check. It either gets done every job or it gets forgotten on the one that costs you the drone. The checklist below has saved me from two would-be crashes and one £600 propeller replacement bill.
- NOTAM and airspace: Open Drone Safety Map or the Altitude Angel app. Check for active Flight Restriction Zones, temporary restrictions, and aerodrome boundaries. If the postcode shows red, you stop and call the air traffic unit.
- Weather window: Wind under 28km/h sustained, gusts under 35km/h. The Mini 4 Pro's published wind resistance is 38km/h, but you want a margin. Rain or visible moisture in the air, you reschedule.
- Battery state: All three batteries at 95 percent minimum. Charge the night before, not on the way to site. A cold winter battery loses 20 percent capacity before you've left the driveway.
- Propeller inspection: Run a fingertip along every blade edge. Nicks or chips mean a swap, not a fly. A propeller failure at 30 metres is not recoverable.
- Customer notification: Knock the door, tell them you are flying, ask them to keep dogs and kids inside for 20 minutes. This is hospitality, not a legal requirement, but it stops the conversation that starts "what's that noise" three minutes in.
- Neighbour courtesy: If you are within 30 metres of a neighbour's garden, a quick knock or note. Most are curious, not hostile. Tell them what you are doing and offer to share the footage of their roof while you're at it.
The whole pre-flight runs in under 10 minutes once it's habit. Skip it, and you'll learn the lesson the hard way; my first close call was a tree branch I'd walked past three times that the drone clipped on a return-to-home path because I hadn't set the altitude properly.
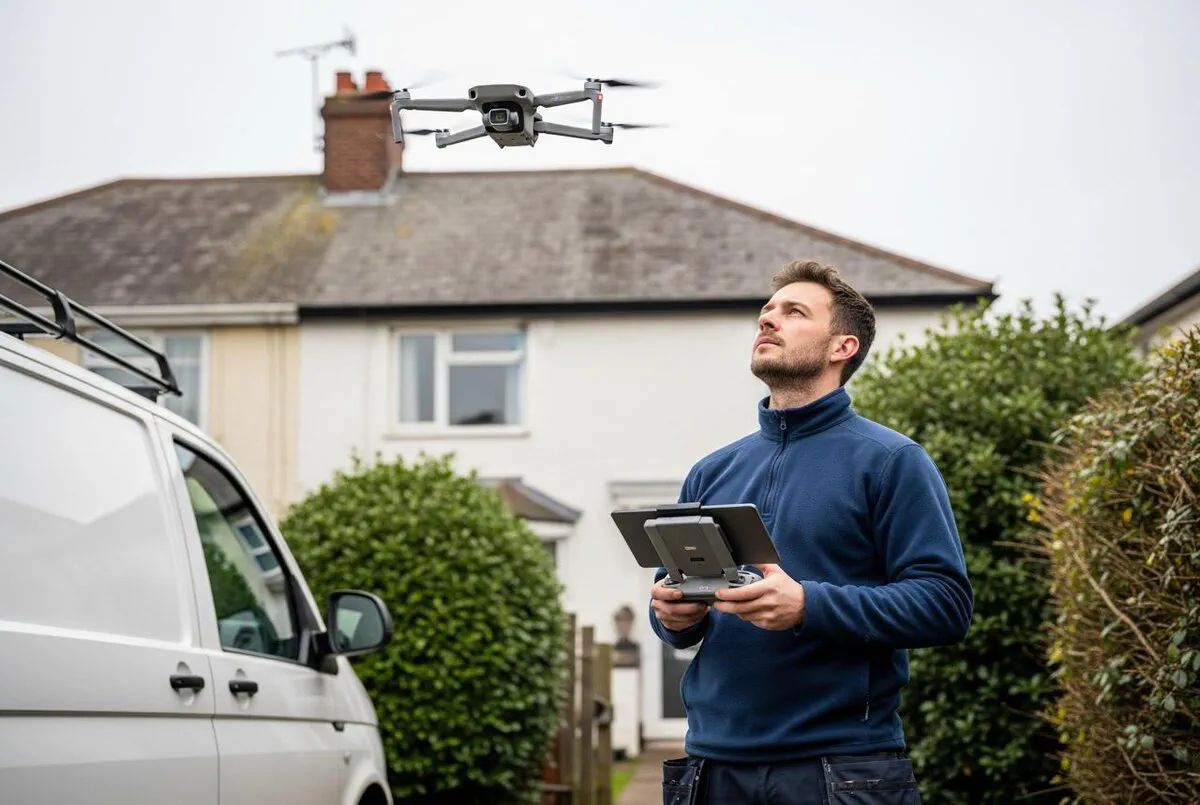
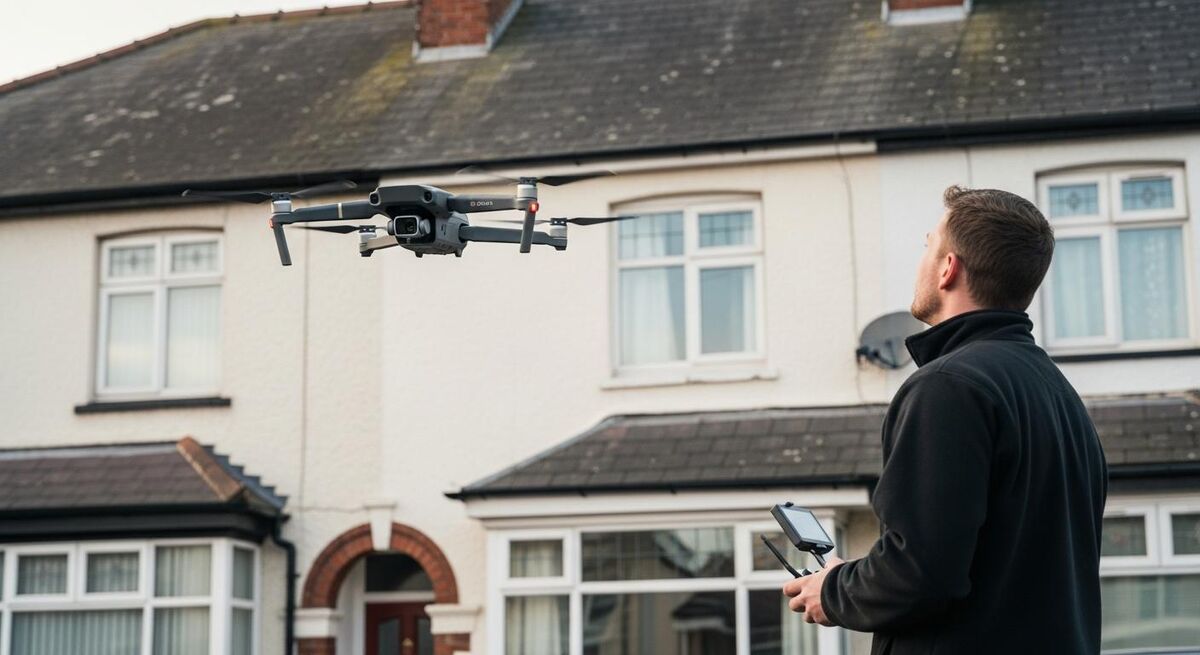
The flight pattern that captures a complete roof
Bad drone footage is worse than no footage. A homeowner who sees a wobbly 90-second clip of their roof in three angles is going to ask a competitor for a second opinion. A homeowner who sees 60 still images, 4K video orbits at four corners, and a 12-shot detail pass on the chimney signs the contract there and then.
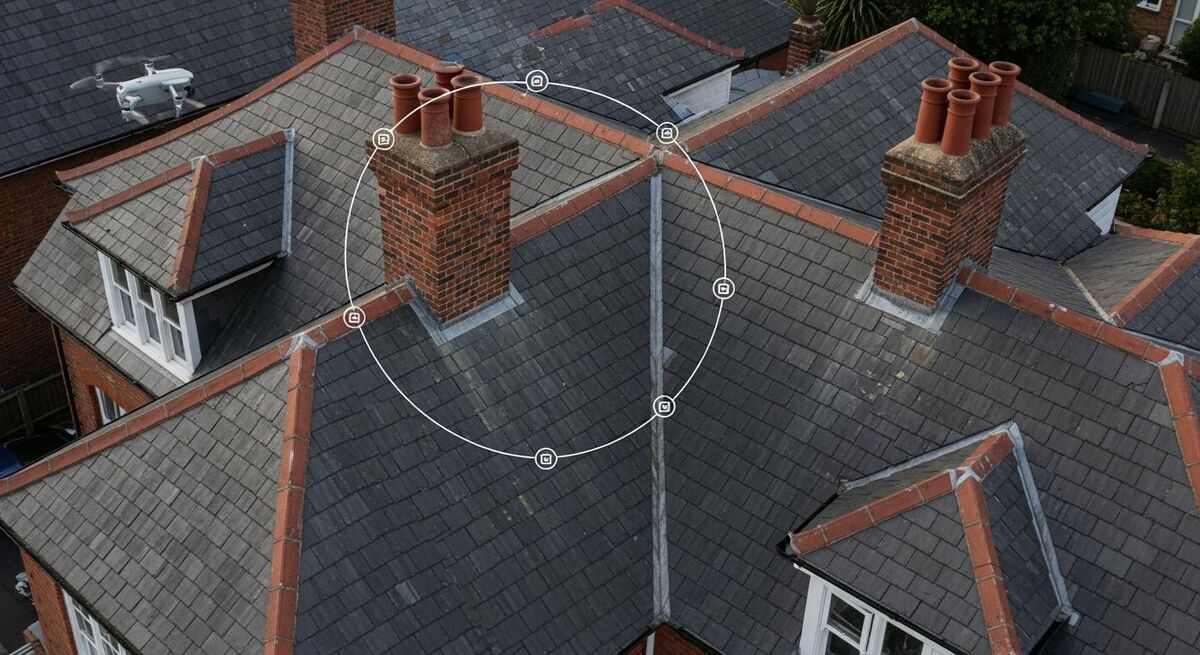
The pattern that works for nine out of ten residential jobs is this. Hover above the centre of the roof at 25 metres altitude, gimbal at minus 90 degrees pointing straight down. Take one shot. That is your overhead reference. Drop to 15 metres above the ridge and orbit slowly clockwise, taking a photo every 30 degrees. That gives you 12 evenly-spaced wide shots. Drop again to 5 metres above the ridge, gimbal at minus 45 degrees, and walk the perimeter taking detail shots of every valley, every flashing, every cut. Finish with a 360-degree video orbit at ridge height for the customer-facing animation. Total time on a typical semi-detached: 12 to 18 minutes.
The DJI Mini 4 Pro has a Waypoints function for repeatable flights. I'd skip it on the first 20 surveys. Manual flying teaches you what good footage feels like, and you'll catch defects in the moment that a programmed flight misses. Once you've built the muscle memory, set up Waypoints for the standard four-corner orbit and you'll knock a survey out in eight minutes flat.
Shoot in 48MP RAW for defects, 4K HDR for client video
Defects are easier to spot in still images. 48MP gives you the room to zoom and crop in post without losing detail. For the client-facing animation that goes into the quote PDF, shoot 4K HDR at 30fps. Two batteries gets you both. Don't try to shoot both modes on the same battery; the file size and processing kills your flight time.
What good imagery looks like, and the AI bit
An AI defect detector is the bit of this article most other drone guides ignore, because most other drone guides are not aimed at trades. The point of AI imagery is not that it does the survey for you. It is that it spots the things you would miss on a tired Tuesday afternoon after three quotes already.
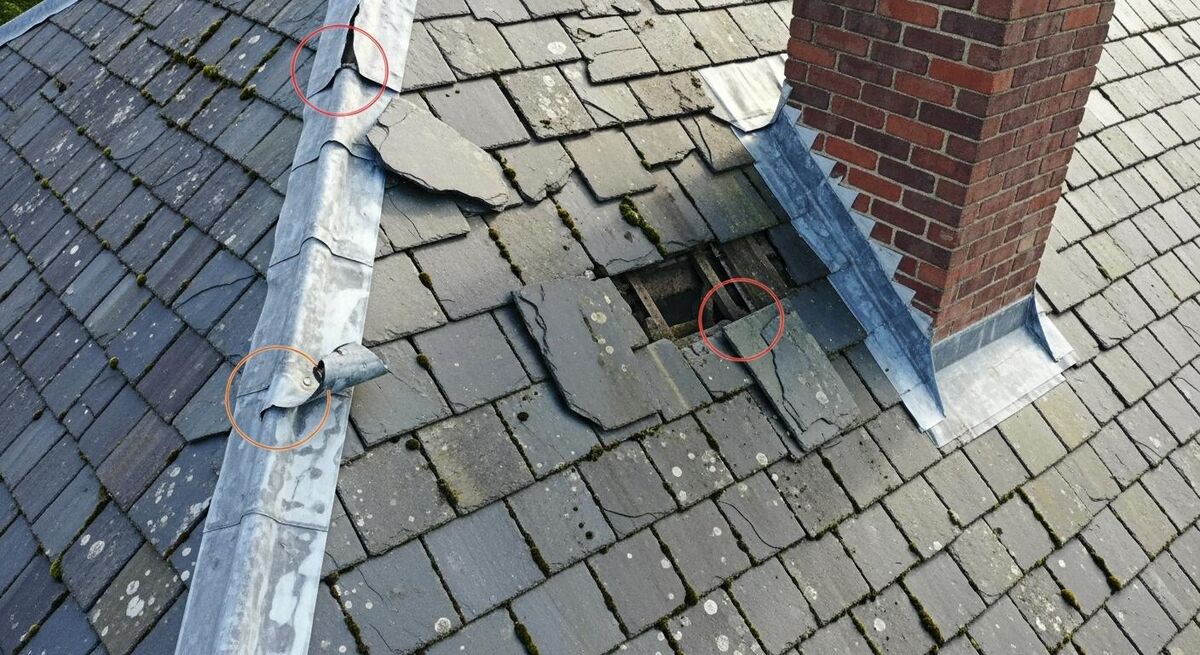
Hammer Missions is the UK-built option that handles this properly. You upload the 60 to 80 photos from your flight, the platform stitches them into a 2D map and a 3D model, then the AI passes over the imagery looking for cracks, surface corrosion, ponding, staining, and displaced tiles. Each flagged area becomes an annotation point in a shareable report. You spend 15 minutes verifying and editing; the AI has done the spotting.
It is not perfect. The algorithm misses moss in shadow and over-flags damp patches that are just rain shadow from a chimney. Treat it as a fast first-pass that catches the obvious stuff. The real value is that the report it generates looks expensive to the homeowner, and that builds trust before you've even quoted. A homeowner who sees twelve colour-coded annotations on a 3D model of their own roof is not going to argue when you tell them the chimney flashing needs redoing.
If Hammer Missions feels too pricey, the cheaper play is Pix4D Capture for the flight planning and any general-purpose annotation tool for the markup. The output is less polished, but it works. The other option a lot of small operators don't consider is dropping the photos into AI image analysis tools via ChatGPT or Gemini Vision. They are surprisingly good at calling out roof defects from a photo, free, and you avoid the monthly subscription. The output is paragraphs not annotations, so it suits the email follow-up rather than the formal report.
Turning footage into a quote that wins
This is where most drone work falls down. The drone takes 20 minutes; the quote PDF takes two hours; the homeowner needs it in 24 hours or they've called someone else. The workflow has to be sharp.
The structure that converts is: cover page with the overhead shot and the property address; one page of executive findings with three bullets (what's urgent, what's monitoring, what's fine); two to four pages of annotated defect photos with brief comments; one page with the work proposed and the price; one page with terms and a clickable accept button. That is six to eight pages, generated in the time it takes to drink a coffee.
I run mine through an automated pipeline. The flight footage goes into a cloud folder; a workflow in n8n or Make picks up the new images, runs them through a defect-detection prompt to Claude or GPT-5, drafts the quote text, drops it into a templated PDF, and emails it to me for review. The whole thing from drone landing to email in the homeowner's inbox is 90 minutes. There is a full step-by-step guide for the AI-quoting pipeline on the academy that shows the exact workflow.
The price the homeowner sees vs the price you do the work for
Don't quote off the drone survey alone. Quote off the drone survey plus a 10-minute ladder inspection of the bits the drone can't see, like the leading edge of a parapet or the inside of a hidden valley. Charge for the drone survey if the homeowner doesn't proceed with the work (£150 to £250 is fair, refunded against the job if they accept). Most people are happy to pay it because they get the report regardless.
The scaffold-versus-drone reality check
The numbers below come from Federation of Master Builders 2025 rate cards, Checkatrade trade pricing data, and what's actually been quoted on jobs I've seen. None of them are theoretical.
| Survey method | Time on site | Cost to homeowner | Detail captured | Best for |
|---|---|---|---|---|
| Drone (DJI Mini 4 Pro) | 30-45 min | £0 internal / £200-500 external | 4K aerial + AI defect map | 2-3 storey residential, light commercial |
| Ladder survey | 60-90 min | £75-150 | Eye-level eaves only | Single storey, low pitch |
| Cherry picker | 2-3 hours | £300-700/day hire | Full close-up access | Awkward access, no street footprint |
| Scaffold tower | 0.5-1 day setup + survey | £900-2,500/week | Full physical inspection | Complex repairs, multi-storey |
The drone wins on speed and on cost-to-customer. It loses on physical inspection. You cannot tell from a drone image whether a slate is loose. You can tell whether it is broken, cracked, lifted, or missing. For 80 percent of residential roof surveys, that is enough to quote with confidence. For the other 20 percent, where the roof might need to come off, you scaffold it after the drone survey, not before. The drone tells you whether scaffold is worth ordering.
Insurance, liability, and when to call in a pro
Your trade public liability policy probably does not cover drone work. Read the small print before you fly your first job. Most policies exclude "aviation activities", which is the catch-all that includes any drone. You need a separate drone insurance policy, or an endorsement on the existing one. Moonrock starts at £31 a month for £1m of public liability and £2,000 of equipment cover. Coverdrone has a pay-as-you-fly product if you only do a few jobs a month, which is around £4 to £8 per flight.
Three scenarios you should not handle with a drone:
- Listed buildings. The detail you need is usually beyond what a sub-250g drone can capture, and the planning paperwork wants RICS-grade evidence. Call in a specialist surveyor with a RICS-accredited drone team.
- Industrial or commercial buildings over 15 metres tall. The wind regime changes, the airspace is often restricted, and the insurance ceiling on your basic policy isn't going to cover a £200,000 plant room.
- Anything you'd need to fly within 50 metres of an active road, railway, or motorway. You technically can, but the moment something goes wrong, the paperwork is brutal.
For everything else, the drone is fine. The skill is knowing where the line is, and most trades cross it because they want the job, not because they thought about it. Don't be one of them.
A 90-minute survey from arrival to invoice
Here is the workflow I'd use on a Tuesday morning quote visit, end to end.
- 0-10 min: Arrive, brief the customer, do the pre-flight checklist, knock the neighbours if needed.
- 10-30 min: Fly the standard pattern. Overhead reference shot, four-corner orbit at 15m, perimeter detail pass at 5m, 360 client-facing video.
- 30-35 min: 10-minute ladder pop-up to check the bits the drone can't see (parapet leading edges, internal valleys, behind chimneys).
- 35-50 min: Sit in the van. Upload imagery to Hammer Missions or your cloud folder of choice. Let the AI defect detection run while you grab a coffee.
- 50-75 min: Review the AI output, verify what's real, add comments, draft the quote. If you've set up the AI quoting workflow, this drops to 10 minutes.
- 75-90 min: Send the quote PDF with embedded survey link to the customer's email. Walk back inside, show them the live 3D model on your phone, talk them through the three findings, and ask if they'd like to proceed.
Two surveys before lunch is achievable. Three is pushing it. Four and you are skipping the bits that matter. The temptation is to treat the drone as a speed gun and quote in volume; the better play is to use the saved time to follow up properly and close more of the quotes you already have.
What tradespeople are saying
Recommended videos
How to Inspect a Roof with DJI Mini 4 Pro Drone
Droneologist
How Much I Actually Make Doing Drone Roof Inspections
Droneologist

How to Inspect a Roof with Drones and AI
Hammer Missions

Roof Measurement with DJI Mini 3/4 Tutorial
airclip
How Close Can You Fly a Drone for a Roof Survey?
Drone roof survey tutorial
Drone Roof Surveys In London: Advanced Roof Inspection Services
Environ Property Services
Frequently asked questions
If you are flying a sub-249g drone like the Mini 4 Pro in the open category A1, you need a Flyer ID and Operator ID. That is it. The old "commercial drone licence" requirement was retired in 2020. If you go heavier or want to fly closer to people, you need the A2 CofC. Roofers using their own drone on their own jobs sit in the open category 99 percent of the time.
New: Mini 4 Pro Fly More Combo £979, Operator ID £12.34, basic Moonrock insurance £372 a year. Total year one: around £1,360. Year two onwards: £384 a year ongoing. Used: Mini 3 Pro from MPB at £534, same ID and insurance. Total year one: around £920.
Legally, with a sub-250g drone, yes, you can fly directly over uninvolved people and properties in the open category A1. Practically, you knock the neighbours anyway. Five minutes of courtesy saves you a complaint to the police, and complaints are how the CAA decides whether to tighten the rules. Don't ruin it for everyone else.
Three weeks of practice in a field. The drone is genuinely easy to fly straight, but a survey needs you to hold a position in wind, control the gimbal smoothly, and judge distances by eye. Most people get there inside 10 to 20 hours of flight time. Practice landing in awkward spots; that's the bit that bins drones, not the actual flying.
If you have proper drone-specific public liability insurance, you call the insurer the same day. Coverdrone and Moonrock both have 24-hour claims lines. If you don't, you are personally liable for any damage. A roof tile is £5 and a tantrum; a conservatory roof is £4,000 and a small claims court appearance. Do not skip the insurance to save £30 a month.
It works for the obvious stuff: cracks, missing tiles, lifted flashing, ponding water, large moss patches. It misses moss in shadow, hairline cracks under coating, and anything that needs a tactile check. Treat the AI as a fast first-pass, not a verdict. The value is in client-facing reports that look professional, not in replacing your eye.
If you charge £200 for a survey and do two a month, that is £4,800 a year of additional revenue from quoting work that used to lose to scaffold competitors. The drone pays for itself in three months and you've improved your conversion rate. The honest answer is: yes, even at low volume, as long as you actually use it.
My verdict
Buy the drone, do the survey yourself, automate the quote
This is not a fad. Drone roof surveys are now the default in residential and small commercial work, and the small trades that adopt the kit have a £500 to £2,000 advantage on every quote against the trades that don't. The setup is under £1,000 and the regulatory paperwork takes one afternoon. The flying is easier than driving a van. The bit that earns the money is the workflow, not the drone, and the workflow is well-trodden ground. Pair the drone with an AI-driven follow-up bot on the quotes and an automated quote-to-PDF pipeline, and you've stripped half a day of admin off every job. Start with one survey a week, learn the kit, then ramp.