Measure a room with your phone: Polycam vs Pix4Dcatch for quick site surveys
Jump To...

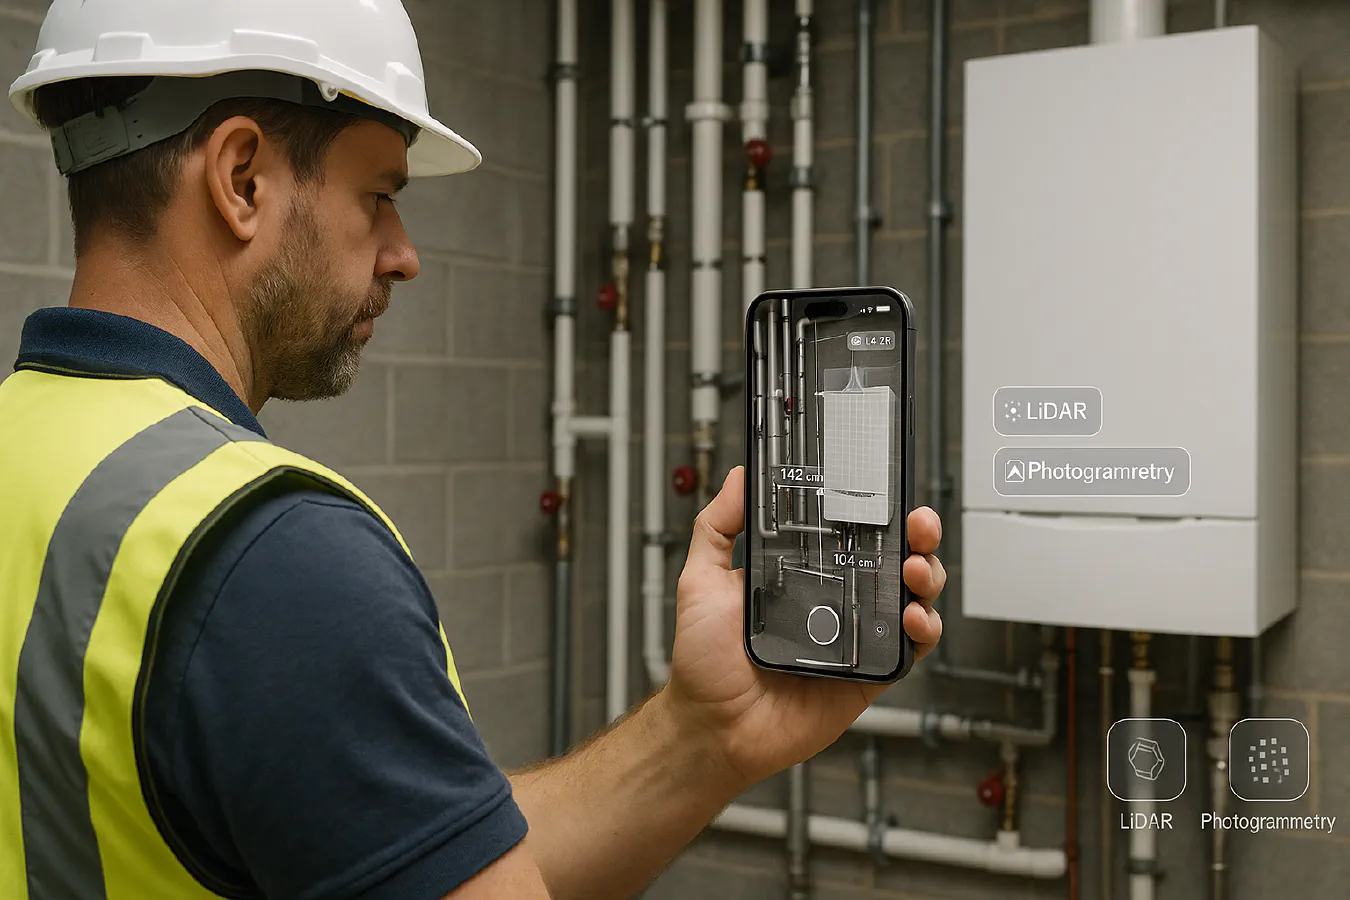
Foreman scanning a plant room with iPhone, mesh and measurements on screen
Quick answer
- Yes, you can measure rooms and small areas with an iPhone Pro using LiDAR or phone photos. Expect around 1–3 cm local accuracy on simple interiors when captured well. For anything that must be millimetre‑tight (fabrication, structural set‑out), use a calibrated laser, add control, or hire a surveyor.
- Polycam is the easiest all‑rounder: fast LiDAR scans for rooms, plus higher‑detail photogrammetry from photos. Pix4Dcatch shines when you pair it with RTK (e.g., viDoc) for centimetre‑level absolute accuracy outdoors.
When to use phone scanning vs a laser or surveyor
Use phone scanning when you need:
- Quick context: layouts, ceiling heights, wall openings, plant rooms.
- Visual checks: where is that pipe run, duct position, beam alignment.
- Early estimates: sanity‑check quantities before ordering.
Use a laser or surveyor when:
- You need sub‑centimetre or guaranteed tolerances for install drawings.
- The area is large or complex and drift could add error.
- You must comply with a spec like RICS Measured Surveys bands.
See RICS guidance on measured survey accuracy bands for how to specify deliverables in the UK. RICS Measured Surveys of Land, Buildings and Utilities, 3rd ed.
What accuracy can you expect
What we see across studies and practice:
- iPhone/iPad LiDAR works best from 0.2–5 m range. On simple planes and short scans: around 1–2 cm typical; over longer walks you may see 3–7+ cm due to SLAM drift. Useful review: indoor LiDAR vs TLS comparisons in 2023–2024 studies summarised here: Elsevier 2023 and Taylor & Francis 2024.
- Phone photogrammetry (Polycam photo mode) often captures finer detail on objects and small areas. For room‑scale, it sits similar to LiDAR unless you add control.
- With Pix4Dcatch plus RTK (e.g., viDoc), vendors and independent tests show 1–5 cm checkpoint RMS in good conditions, which is useful for external as‑builts. See Pix4D Labs and Bureau Veritas certification reported by LIDAR Magazine.
Tools compared: Polycam vs Pix4Dcatch
Polycam
Strengths: very fast LiDAR room scans, easy photo‑mode for higher detail, simple sharing. Good for builders’ interiors, kitchens, plant rooms.
Limitations: absolute accuracy drifts over longer walks; vendor states “up to 98 percent” in ideal setups. For tight tolerances, add check measurements.
Pix4Dcatch
Strengths: designed for survey workflows, takes control/RTK. With viDoc RTK you can reach centimetre‑level absolute accuracy. Good outdoors and for as‑builts that need coordinates.
Limitations: more setup, licensing, and cost. Without control/RTK, accuracy is similar to other phone scans.
Step-by-step workflow
Follow this simple plan to avoid rework.
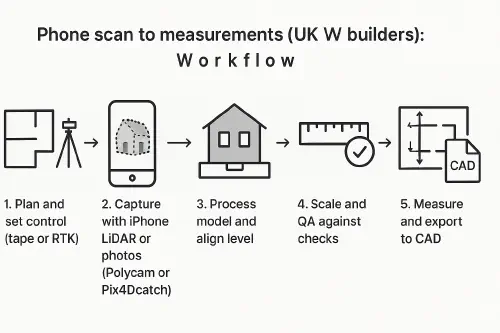
Phone scan to measurements workflow diagram
- Plan and set a reference
- Note the room size and tricky areas. Place two long check measurements with a tape or laser across the space (e.g., diagonal and long wall). Photograph the tape positions.
- If outdoors or you need coordinates, plan for control points or RTK with Pix4Dcatch.
- Capture with your phone
- Polycam LiDAR: walk slowly, keep 0.5–3 m from walls, circle features. Pause to let the mesh settle. Avoid shiny glass or mirrors.
- Polycam Photo: take 50–150 photos, steady arc movements, good lighting, overlap 70 percent.
- Pix4Dcatch: steady pace, follow the app’s guidance. If using RTK, keep clear sky view and fix before capture.
- Process and align
- In Polycam, process on‑device or cloud. Trim out noise. In Pix4D, process and review point cloud/mesh quality.
- Align the model to level. Most apps let you set floor and walls to vertical/horizontal.
- Scale and QA
- Compare model distances to your two long tape checks. If off, rescale or adjust. Re‑check after scaling.
- Measure and export
- Use the app’s measurement tools for lengths, areas, volumes.
- Export: DXF/DWG or orthophotos for CAD, or share a view link for quick client decisions.
QA checks so you don’t get caught out
- Always take two long check measurements that cross the space. Use them to validate scale.
- Avoid mirrors and shiny tiles; they confuse depth sensors. Dull them with a cloth or capture from an angle.
- Keep scan paths short. For large floors, split into zones and stitch.
- Document your method in notes: app, mode, device, date, checks. This protects you if there’s a dispute.
- For work under formal specs, align to RICS accuracy bands and state what you can and can’t guarantee. RICS Measured Surveys
Export to CAD or share on WhatsApp
- CAD: From Polycam, export DXF, GLTF or orthographic images. From Pix4D, export point clouds/meshes and orthos. You can bring an ortho image into CAD and trace for a quick elevation. Example workflow from UK surveyors Bury Associates: From 3D scan with your phone to 2D CAD elevation drawing.
- WhatsApp: share the Polycam view link with a client or subbie so they can see measurements and context immediately.
Recommended watch
Related articles
- Generate a materials list from plans or photos with AI: fast takeoffs for small contractors
- AirTag vs GPS tracker for vans and tools: what to use and how to set it up
- How to use a thermal camera on site: find leaks, damp and hot connections
Ready to Transform Your Business?
Turn every engineer into your best engineer and solve recruitment bottlenecks
Join the TrainAR Waitlist