
Part L photo evidence: the simple workflow to capture, geotag and auto-build a BREL-ready PDF pack
Jump To...
Category: How-to Guides • Niche: Building control documentation, Part L photographic evidence, light automations
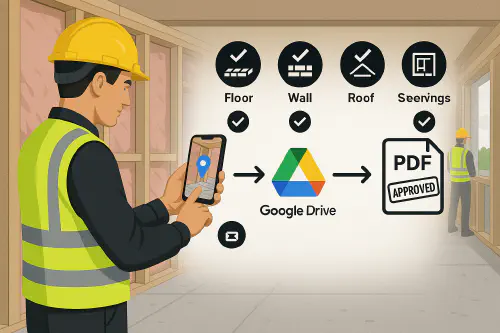
Site manager capturing a geo-tagged insulation photo; flow from phone to Google Drive to PDF
Contents
- Quick answer
- What Building Control and SAP actually need
- The workflow at a glance
- Step-by-step setup
- Field tips that save rework
- Turn photos into a BREL-ready PDF pack automatically
- Troubleshooting and common pitfalls
- FAQ
Quick answer
- Enable location on your phone camera so every photo is time and geo‑tagged.
- Shoot the Part L Appendix B7 shots while details are still open (foundation edge insulation, wall junctions, roof eaves, openings, services labels and insulation).
- Send the originals as documents (not photos) if using WhatsApp, or upload via a Google Form to Google Drive so EXIF is preserved.
- Index photos in a simple Google Sheet by plot and B7 code.
- Auto‑merge the index + photos into a branded PDF report using Autocrat so your SAP assessor can complete the BREL and you can submit to Building Control.
What Building Control and SAP actually need
For new dwellings in England, Approved Document L Volume 1 (2021 with 2023 amendments) requires photographic evidence per Appendix B. The images must be unique to each dwelling, captured at the right stage and of sufficient quality to allow an audit.
Helpful references:
- Approved Document L Volume 1: Dwellings (Appendix B: photographic evidence). See B7–B8 for the exact list and rules. Official PDF
- NHBC summary and reminders on timing and quality expectations: NHBC technical update
What to photograph (B7 summary):
- Foundations/substructure and ground floor: perimeter edge insulation, external door thresholds, insulation below DPC on external walls.
- External walls (each wall type): ground floor–wall junction; penetrating elements with insulation continuity; clean cavities/ties before closure for blown-fill.
- Roofs (each roof type): insulation at joist/rafter level; eaves and gable edges.
- Openings (each opening type): window and doorset position relative to the insulation line/cavity closer.
- Airtightness: include extra shots where not visible above (membranes, tapes, sealed penetrations).
- Building services: plant/equipment ID labels; primary pipe insulation continuity; MVHR/duct insulation if outside the thermal envelope.
Photo rules (B8): digital, high‑resolution, geotagged, date/time stamped, taken at the correct construction stage, one clear image per detail, more if needed.
The workflow at a glance
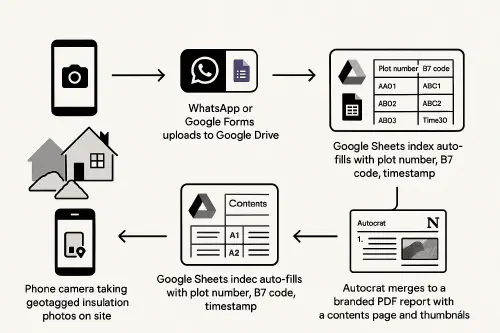
Flow: Phone → WhatsApp/Forms → Drive → Sheets index → Autocrat PDF
- Phone camera takes geo‑tagged photos on site.
- Upload originals to Google Drive via WhatsApp Document or a Google Form.
- Google Sheets logs plot, B7 code, timestamp, file link.
- Autocrat merges into a PDF report with thumbnails and a contents page.
Step-by-step setup
1) Enable geo‑tagging on phones
- iPhone: Settings → Privacy & Security → Location Services → Camera → While Using the App + Precise On. Confirm date, time and time zone are correct.
- Android: Camera settings → Save location On. Confirm date, time and time zone.
Optionally, remind teams with a one‑pager on their phones.
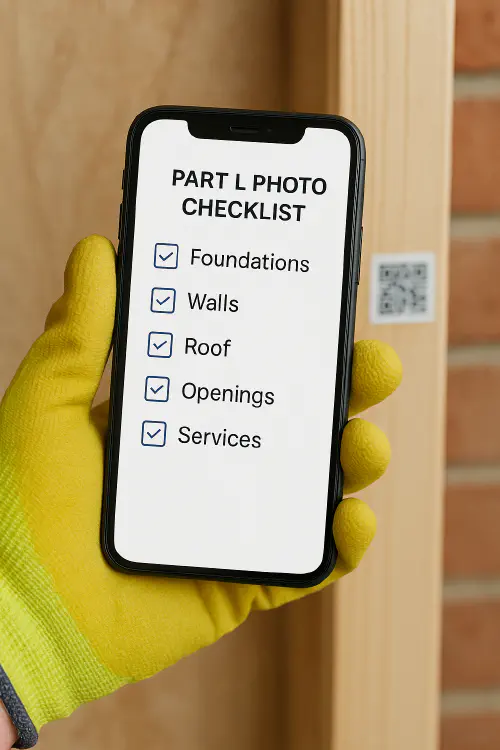
On‑phone B7 checklist screenshot held by a gloved hand
2) Create a simple folder and file‑name convention
- Google Drive root: SiteName/Plot‑01/Part‑L/
- File name pattern: Plot01_B7_3b_eaves_2025‑09‑23_10‑32.jpg
- Keep originals unchanged. If you annotate, save a copy as Plot01_B7_3b_eaves_annotated.jpg and keep the original too.
3) Fast capture routes that preserve EXIF
- WhatsApp Business (Document mode): in chat, pick Document, not Photo/Video. Select originals from Files (iOS) or File Manager (Android). This keeps EXIF and full quality.
- Google Form with file upload: create a Form with fields Plot number, B7 code, Notes; add File Upload. Files land in a Drive folder with a timestamp and responder email for traceability.
4) Build the index automatically in Google Sheets
- Connect your Form to a response Sheet. Add columns for: Drive URL, File name, Plot, B7 code, Taken date/time (from EXIF if available), Shooter initials, Notes.
- You can parse the file name to auto‑fill B7, plot and date using simple formulas, or use an Apps Script/Zapier/Make step to read EXIF into the Sheet.
5) Autocrat merge to a branded PDF
- Create a Google Docs template with your logo, cover page, contents, and a photo table.
- Install the Autocrat add‑on in Google Sheets. Map Sheet columns to template placeholders. Include Drive thumbnail links so images embed in the PDF.
- Set Autocrat to run on form submit or daily, outputting a PDF named Site_Plot_BREL‑photos.pdf into the Part‑L folder.
6) Share with your SAP assessor and Building Control
- Share the Drive folder with view‑only permissions, or export the PDF bundle and share the link.
- Keep the originals in Drive as your master evidence set.
Field tips that save rework
- Take wide, mid and close‑ups. Include a tape or marker for scale where useful.
- Make sure insulation thickness, labels and continuity can be seen clearly.
- Photograph before closing up. If you miss a stage, log it and agree an alternative with your assessor.
- For blown cavity insulation, include a shot showing clean cavities and ties before filling.
- For services, include the plant label (make/model/serial) and show pipe and duct insulation continuity.
Useful background reading:
- LABC explainer on closing the performance gap and using as‑built evidence: LABC
Turn photos into a BREL‑ready PDF pack automatically
- Use Autocrat or Docupilot to merge your Sheet into a PDF with: cover, contents, per‑plot sections, thumbnail grid, and a table listing file name, B7 code, date/time, GPS.
- Add a QR code to the PDF that links to the Drive folder for the full‑resolution originals.
- Optional integrity step: generate a checksum list of file hashes for your archive.
Troubleshooting and common pitfalls
- Photos show wrong time or no GPS: check the phone’s clock/time zone and camera location permission.
- WhatsApp stripped metadata: resend as Document from Files/File Manager, not as Photo/Video.
- Blurry images: retake with better light or take a close‑up. The image must allow an auditor to verify the detail.
- Missing shots: agree the B7 list with your assessor at the start; use a checklist per plot and tick as you go.
- Images not embedding in Autocrat: ensure the Sheet column contains the correct Drive share link and that the file is accessible to Autocrat.
Related articles
- Construction photo report from your phone: simple workflow, templates and tools
- Lone worker check-in system for construction: QR and WhatsApp setup, intervals and HSE rules
- Gas safety and EICR reminders for landlords: simple automation for trades
FAQ
Do I need one photo or many per item?
One clear image per listed detail per dwelling is the minimum. Take more if needed to show clarity or continuity.
Do I have to geotag every image?
Part L expects date/time and location evidence. Enable location services for the Camera and keep originals. If geotagging is not possible for a shot, ensure other evidence ties it to the plot.
Can I submit edited or marked‑up images?
Yes, but keep the unedited originals. Submit both, clearly labelled, so the EXIF in the original stands as the evidential record.
Will this work for Wales or for existing homes?
This guide targets new dwellings in England per Approved Document L Volume 1. Wales has its own timelines; check with your assessor/building control body.
Is WhatsApp acceptable for Building Control?
You can use it for collection and communication, but keep a master set of originals in Drive and submit the PDF plus a link to originals. Always send images as Documents to preserve EXIF.
Ready to Transform Your Business?
Turn every engineer into your best engineer and solve recruitment bottlenecks
Join the TrainAR Waitlist